
How to make photo magnets and use them creatively?
How to make photo magnets from your own photographs?
You can easily make your own photo magnets at home without any special equipment. All you need are printed photographs or images, self-adhesive magnetic foil, scissors and a few common tools.
- Find out everything you need to make your own photo magnets.
- See the exact process for attaching a photograph to magnetic foil.
- Learn how to prevent bubbles, crooked application and lifting corners.
- Find out which surfaces the magnets will adhere to.
- Discover creative ideas for using photo magnets at home, at school and in the office.
- Get answers to the most common questions about making your own magnets.
Photo magnets are a simple way to turn favourite photographs, children's drawings, recipes or keepsake tickets into practical decorations. Finished magnets can be attached to a refrigerator, metal cabinet, shelving, magnetic board or another suitable steel surface.
The easiest option is to use a ready-made set of self-adhesive magnetic pieces in a format of approximately 10 × 15 cm. The self-adhesive side is used to attach the photograph, while the magnetic side holds the finished item on a metal surface.
What do you need to make photo magnets?
The basic materials are a printed photograph or image and self-adhesive magnetic foil. For standard photographs, a format of approximately 10 × 15 cm is practical.
Required tools and materials
- printed photographs, images, recipes or other designs,
- self-adhesive magnetic foil or ready-cut magnetic pieces,
- sharp scissors,
- a utility or craft knife,
- a metal ruler,
- a cutting mat,
- a clean, dry cloth,
- and, if needed, a pencil for marking the cut.
What paper should you use for the photograph?
You can use standard photo paper, matt paper or a high-quality image printed on a home printer. The important thing is that the paper is flat, dry and free from dust or grease.
Allow a freshly printed photograph to dry thoroughly before attaching it so that the ink does not smudge while you smooth it down.
How to make photo magnets step by step
The process itself is simple, but the greatest care should be taken when positioning the photograph accurately. Once the image touches the self-adhesive layer, correcting its position can be difficult.
1. Prepare a clean work surface
Remove dust, hair, metal filings and other dirt from the worktop. Place a cutting mat or another firm material under the magnetic foil so that you can safely cut with a knife.
Before applying the photograph, gently wipe it with a dry cloth. Also check the adhesive surface of the magnetic piece to make sure no dirt can become trapped under the photograph.
2. Check the dimensions of the photograph and magnetic foil
First place the photograph on the magnetic foil without removing the protective paper. Check that the dimensions match and whether the photograph or foil needs to be trimmed in advance.
The ready-made set is approximately 10 × 15 cm, specifically 152 × 102 mm. The actual dimensions of photographs from different photo labs may vary by a few millimetres.
3. Remove the protective layer
Place the magnetic foil with the magnetic side facing down and the self-adhesive side facing up. Carefully begin peeling away the protective paper.
For more accurate work, you do not need to remove all of the protective paper at once. You can first expose only a narrow strip of adhesive, position the photograph and then gradually remove the rest of the backing.
4. Position the photograph against one edge
First align the photograph precisely with one corner and one edge of the magnetic foil. Allow only a small part of the photograph to make contact with the adhesive layer.
Before continuing, check that the image is not crooked and that all edges are properly aligned.
5. Attach the photograph gradually
Slowly pull away the protective paper with one hand while smoothing the photograph from the attached section towards the free edge with the other.
Use a clean, soft cloth or a plastic card wrapped in fabric. Gradual smoothing helps push out air and reduces the formation of bubbles and creases.
6. Press both layers firmly together
Once the photograph is attached, smooth the entire surface with a cloth. Pay particular attention to the edges and corners, which may lift later if they are not pressed down sufficiently.
Do not press a sharp object directly onto the photograph, as this could damage the print or create scratches.
7. Trim the magnet to the required shape
Straight edges can be trimmed with a utility knife along a metal ruler. Cut on a suitable mat and make several lighter passes rather than one excessively forceful cut.
For curves, rounded corners or irregular shapes, use sharp scissors. Magnetic foil with a thickness of 0.5 mm is flexible and can be cut with ordinary scissors.
8. Test the finished magnet
Place the finished photo magnet with the magnetic side against a clean steel surface, such as a refrigerator door or sheet-metal cabinet.
Test the magnet first in a less visible area. Some modern refrigerators have non-magnetic or only weakly magnetic doors.
What should you watch out for when making photo magnets?
- Do not place the photograph on a dusty or greasy adhesive surface.
- Do not remove the protective layer before the image is positioned and ready.
- Do not place the entire photograph onto the adhesive at once.
- Use a metal ruler and protective cutting mat when cutting.
- Always move the knife away from your body and hands.
- Do not use the finished magnet on a wet or dirty surface.
- Do not confuse the magnetic side with the self-adhesive side.
How to remove bubbles from under the photograph
The best solution is to prevent bubbles from forming by applying the photograph gradually and smoothing it from the centre towards the edges.
If a small bubble appears near an edge, you can carefully lift the photograph and smooth the area again. A bubble in the centre of a firmly attached photograph is more difficult to correct, and peeling the image back may damage the paper or weaken the adhesive layer.
Which surfaces will photo magnets stick to?
Magnetic foil adheres to ferromagnetic materials, especially iron and ordinary magnetic steel.
Suitable surfaces
- magnetic refrigerator doors,
- steel magnetic boards,
- sheet-metal cabinets or chests of drawers,
- metal shelving,
- steel frames or structures,
- some metal doors.
Unsuitable surfaces
- wood without a steel backing,
- glass,
- plastic,
- aluminium,
- copper and brass,
- some types of stainless steel,
- ordinary plastered walls.
If you are unsure whether a surface is magnetic, test it first with a small ordinary magnet.
Magnetic foil is not a magnetic board
Self-adhesive magnetic foil is designed to attach itself to a suitable metal surface. It is not intended to replace a steel magnetic board onto which additional magnets can then be attached.
Creative ways to use your own photo magnets
Photo magnets do not have to be purely decorative. They can also serve as practical teaching aids, family organisers, reminders of important events or original gifts.
1. Family photographs and important moments
Create a small family gallery on the refrigerator. You can use wedding photographs, pictures of children, pet photos, holiday snapshots or a chronological overview of important events.
2. An original gift for the family
A set of custom photo magnets can make a personal gift for parents, grandparents, siblings or friends. You can add a date, a short message or a description of the event shown in the photograph.
3. Learning aids for children
Turn images into magnetic letters, numbers, animals, vehicles or pieces of simple puzzles. Children can use a magnetic board to build words, match pictures and practise counting.
4. Family messages and tasks
Make magnets with the names of family members, household chores, planned visits or recurring tasks. The magnets can be moved depending on who is responsible for a particular task.
5. Recipes and meal planning
You can attach favourite recipes, ingredient lists or photographs of prepared meals to the magnets. Smaller magnets can also be used to create a weekly meal plan.
6. Travel photographs
Instead of ordinary tourist souvenirs, use your own photographs of cities, nature and interesting places you have visited. You can also include admission tickets, travel tickets or small travel collages.
7. Motivational magnets
Create magnets featuring goals, motivational quotes, a fitness plan or photographs showing your progress. Placing them somewhere visible can help remind you regularly of the goal you have set.
8. Organising the office and workshop
Magnets can be used to label drawers, metal cabinets, work tasks, holiday dates or the status of individual projects. Simply use printed text, an icon or colour coding.
How long do custom photo magnets last?
Their lifespan depends mainly on the quality of the photograph, the way it is attached and the conditions in which it is used. In a dry indoor environment, photo magnets can last for a long time.
Protect them from water, prolonged humidity, grease, high temperatures and direct sunlight. A paper photograph without a protective layer is not waterproof and may fade or become damaged over time.
Recommended product
For a simple way to make your own magnets, you can use a ready-made set of self-adhesive magnetic pieces in a standard photo format.
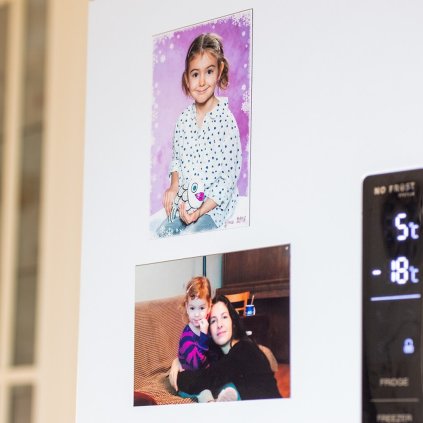
Photo magnets – kit for making 10 custom magnets
A set of flexible magnetic pieces with a self-adhesive layer, ready for attaching photographs, images, recipes or other paper designs.
- 10 individual magnetic pieces
- Dimensions of each piece: 152 × 102 mm
- Thickness: 0.5 mm
- Self-adhesive surface
- Ferrite magnetic foil
- Magnetic force approximately 29 g/cm²
- Can be cut with ordinary scissors
- The magnetic side can be repositioned repeatedly
Frequently asked questions about making photo magnets
What do I need to make photo magnets?
You need a printed photograph, self-adhesive magnetic foil, scissors or a cutting knife, a metal ruler, a cutting mat and a clean cloth.
Do I need to use glue?
No. The magnetic pieces have their own self-adhesive layer. Simply remove the protective paper and gradually press the photograph onto the adhesive surface.
What photograph size is suitable?
The set is designed for photographs measuring approximately 10 × 15 cm. The actual magnetic piece measures 152 × 102 mm, so it is best to position the photograph and check the fit before attaching it.
Can magnetic foil be cut?
Yes. Foil with a thickness of 0.5 mm can be cut with ordinary sharp scissors. Straight edges can be cut with a knife along a metal ruler.
Can I cut a photo magnet into a round shape?
Yes. First attach the photograph to the foil and then cut both layers together with sharp scissors. Very small or complex shapes may be more difficult to work with.
How can I prevent bubbles?
Do not place the whole photograph onto the adhesive at once. Align one edge and attach the image gradually while smoothing it with a cloth towards the free edge.
Can I remove and reattach a photograph if it is crooked?
Sometimes a freshly positioned corner can be carefully corrected. Once it has been pressed down firmly, however, peeling it back may damage the photograph and reduce the effectiveness of the adhesive layer.
Can I use a photograph printed at home?
Yes. The image should be of sufficient quality, completely dry and printed on paper that does not curl easily during application.
Will photo magnets stick to every refrigerator?
Not always. Some refrigerators have doors made from non-magnetic stainless steel, plastic or another material. Test the surface first with an ordinary magnet.
Will the magnets stick to a wooden cabinet or wall?
Magnetic foil on its own will not adhere to wood, glass, plastic or plaster. The surface would need to include a suitable steel counterpart or magnetic board.
Is magnetic foil the same as a magnetic board?
No. The foil itself adheres to a steel surface, but it is not suitable as a backing surface for attaching additional magnets.
Can photo magnets scratch a refrigerator?
Soft magnetic foil does not normally damage the surface by itself. Scratches can, however, be caused by dirt, metal filings or sand trapped between the magnet and the refrigerator door. Keep both surfaces clean.
Are photo magnets waterproof?
The magnetic foil itself can tolerate ordinary wiping, but the paper photograph is generally not waterproof. Protect finished magnets from water and prolonged humidity.
Can photo magnets be used outdoors or on a vehicle?
A kit using paper photographs is intended mainly for dry indoor use. Rain, sunlight, temperature changes and airflow can damage both the photograph and the adhesive bond.
Can I attach a laminated image to the foil?
Yes, provided the laminated surface is clean and flat and the adhesive layer bonds to it correctly. If you are making a larger batch, it is advisable to test one piece first.
Can the finished photo magnet be repositioned repeatedly?
Yes. The magnetic side can be removed from a metal surface and placed elsewhere repeatedly. The self-adhesive bond between the photograph and the foil, however, is not designed to be repeatedly separated.
Are photo magnets suitable for children?
Children can help choose images and smooth down the photograph. Cutting with a knife and working with sharp scissors must be carried out or supervised by an adult.
Summary
Making your own photo magnets is simple and does not require any special tools. Simply position the photograph accurately on the self-adhesive magnetic foil, smooth it down gradually and, if necessary, trim the finished piece to the required shape.
The best results are achieved on a clean work surface, with a completely dry photograph and by removing the protective layer gradually. Use the finished magnet on a clean ferromagnetic surface, such as a magnetic refrigerator door or sheet-metal cabinet.
Photo magnets can be used as a family gallery, teaching aid, organiser, recipe collection, motivational tool or personal gift for someone close to you.
Create your own photo magnets
Choose a ready-made set of self-adhesive magnetic pieces and turn your favourite photographs, images or recipes into original magnets.